Wednesday, 26 April 2017

Birthday Timeline Concept

Take #1 on Birthday Timeline Shoot


So on my last blog post I discussed my ideas for the make-up, and had made my horns for the hair to be wrapped around. I created this hair chart to show the way in which the hair would be entwined into the horns and make it seem like they are part of her as a character. This to me seems more effective than just sticking a pair of horns on her, as by encompassing it into part of the character it gives the idea of how she has become this evil creature with her hair growing into horns. 
The initial plan was to use some of the hair, back comb and crimp it, then use hairspray and gel spray to wrap it around the horns. I wanted to leave the rest of the hair down to flow around it. This is also inkeeping with the Maleficent research which I did in my previous blog, who also has horns growing from her head. I wanted to take inspiration from this but make it my own, by having the horns made from hair instead of latex like in the film.


Face Chart


Product List:

Snazaroo Silver Cream Paint over the face and body as the silver base.
- Illamasqua Shadow 'Trance' from the Vital palette as contour and shading around the cheekbones.
MAC Pigment 'Vanilla' as highlight on the cheekbones, lips and nose.
- I also planned to use some cosmetic grade silver glitter and work that into the forehead area.
NYX white Gel liner  in the waterline and buffed into the eyelashes and brows.


Shoot Day 

I organised the shoot for this and hired a studio. I had the latex nose piece which I had made for the shoot, and applied it and did the hair/make-up. 


This was the initial look that I created. I stuck on the prosthetic nose piece using spirit gum, and blended out the edges using latex. 
I had some problems trying to blend the piece into the skin, as the edges weren't as thin as I'd hoped, and so you could see the line of where the piece met the cheek. Although I loved the shape and silhouette which the nose made from the side profile, I had to make the decision about what I was going to do. As you can see from the image on the right, even on my phone camera I could pick up the really harsh edges - which I knew would be magnified and picked up straight away infront of the lighting and professional camera.

I tried to think on my feet and made the call to remove the nose prosthetic. I was really disappointed as this was meant to be the focal point of my piece, and I had to remove it in order to salvage the look. 
I was disheartened but tried to make it work as best as I could in the situation, really contouring and highlighting the tip of the nose to give it the upturned effect I wanted from the prosthetic piece.

I also struggled with the hair on this piece. As the model had glued in hair extensions I could not pull the hair up flat to the head and wrap it around the horn. The model had also recently had her hair cut, meaning the hair was not long enough to cover the end of the horns as I'd first anticipated. Again I tried to think on my feet, and tried to feather the hair at the top of the horns. As the horns were made of a silver material, when I blended the hair around the top, the silver bits at the top looked like ice (which was really in keeping with the theme). So this worked to my advantage. I also used all of the models hair and took it up into the horns, instead of leaving half down as in my drawings. This is because I needed to use all of the hair to get the coverage on the horns.

Final Images (From Shoot #1)


Evaluation:

I feel that I learnt a lot from this shoot, even though I wasn't entirely happy with it, or the final image.
I made the decision to redo this shoot and rethink some of my ideas to create a more streamlined aesthetically pleasing piece. This has shown me where my strengths lie - body painting and details within the make-up. I am going to use this to create a much better final piece which I am happy with.

What I've learnt from this:
I learnt about prosthetic pieces - this was the first I'd ever made and so I learnt so many skills within that and the processes needed. I have learnt the hard way to ensure I take more time and care with making thin edges and a seamless piece - it pays off if you take this extra time.
I had challenges with the hair, I'm not confident with my avant garde hair skills and so this did push me outside of my comfort zone, which I feel is what I need to do more often. Although I feel that the hair does not look very good, it looks untidy and I can see all the areas in the final image that it should have been tweaked. But now I'm aware of these problems which can arise when doing avant garde hair ups, and I will be more prepared to handle them in future. 

Live Model Concept

Female Model

So far in my live model posts I have been exploring the injured soldier character which I will be portraying. I decided to have a second model - a female - who would act as the soldiers' stay at home wife from the 1940's. I thought this would give me the chance to show my ability to do both special fx and more of a generic make-up: both of which are skills needed within the TV and film industry. 

To begin I looked at some typical 40's makeup looks and styles which were really common and popular at the time.
From my research I found that the look on the right (Reference 1) was a really typical glamorous makeup of the era. Brows were relatively thin and arched - not as thin as the previous decade but still very rounded and pencilled in.
The eye make-up was beginning to follow a 'cat eye' style trend with winged liner being commonly worn. Shadows used were typically cool tones such as silver and grey which were subtly blended on the eye.
The skin was quite pale, with minimal bronzer and a touch of blusher. 
The significant feature is the red lip which was iconic for the era for a glamorous look.

I wanted to create a look which was very glamorous at the time, but still create a believable 40's housewife character. At the time, the women were staying at home whilst the men were fighting in the war. The use of make-up began to drastically increase as women were now more independent and going into the workplace in place of men. So the make-up was very symbolic of that new independence of women; something I want to portray. 

Hair


I felt that as I was creating a typical 40s housewife look it would be really fun and fitting to do a typical housewife hairstyle of the time.Many of the images of 40's housewives depict them with their hair rollers in with a scarf around their head. I thought this would be a nice touch as it is historically accurate and explains to the viewer a lot more about my concept and who this woman is representing.
I will therefore be leaving my models' hair in rollers for the final look.


Face Chart:


Product List:
Click on the product to be taken to the website.


Eyes:
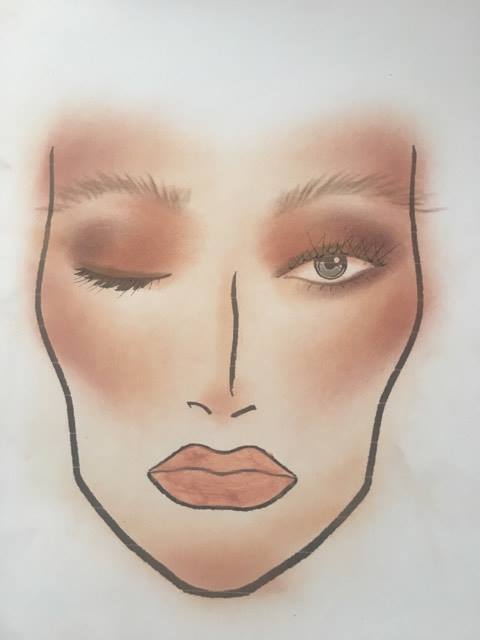
Illamasqua Brow Cake  in Thunder to fill in the brows. I am using this as I don't want them to look to sharp or overdone by using a gel, so the wax powder will keep them looking natural.
- Urban Decay Eye Primer Potion on the lids to create a natural base for the eyeshadow to stay on. I am using an eye primer as the make-up will be on a long time and I want it to stay perfected.
'Trace' shadow from the Illamasqua Vital Palette as a transition shade buffed into the socket of the eye with a fluffy brush.
MAC 'Print' eyeshadow in the crease of the eye to darken.
NYX Gel liner in Black to create a winged liner. Set with Urban Decay 'Blackout' eyeshadow to ensure it lasts the evening. 
Maybelline Colossal Mascara in Black on the upper and lower lashes. 

Face:
Charlotte Tilbury Wonderglow Primer as a base on the skin for longer lasting foundation.
Illamasqua Skin Base Foundation, as it gives a nice medium coverage and will not give flashback for any images taken.
Jay Manuel Photo Illusion Concealer under the eyes and on blemishes.
Ben Nye Translucent set powder to stop any shine, and to set the make-up and keep it in place.
Illamasqua Blusher 'Naked Rose' on the cheeks.
- A bit of MAC Matte Bronzer under the cheekbones.

Lips:
Illamasqua 'Box' Lipstick; this is a blue undertone red which I feel is really fitting with the 40's theme. Corally and brighter reds were more prevalent in the 50's.
Illamasqua Lip Pencil in 'Assert' to line the lips and create a sharp lip line.


References:
Vintagemakeupguide.com. (n.d.). 1940s makeup styles | vintage makeup guide. [online] Available at: http://vintagemakeupguide.com/1940s-look/ [Accessed 26 Apr. 2017].
Fine Art America. (2013). Woman 1942 1940s Uk Cooking Women by The Advertising Archives. [online] Available at: https://fineartamerica.com/featured/woman-1942-1940s-uk-cooking-women-the-advertising-archives.html [Accessed 26 Apr. 2017].

Friday, 21 April 2017

Post Apocalyptic Fashion Show

The Hair & Make-Up


So in my first blog about this concept (Click here to view) I discussed the type of look which we were going for; post apocalyptic, charity shop chic style looks. So I began to consider make-up which I felt would best fit this theme.

As I previously explained in my blog, the model was wearing hessian cloth as a top, with a rope belt, and a handmade tatty burnt looking skirt. I felt that this kind of look needed to be complimented with similar burnt earth tones - which made the model look gaunt and like they were really weathered and had been living in the post apocalyptic slums.


The image on the right (Reference 1) is from a YouTube make-up tutorial of a post apocalyptic survivor - click here to view. I took inspiration from this and I loved the way that she made the make-up look so earthy and like dirt, using pigment and shadow. This is a technique I wanted to use in my make-up look. To create this I decided I would use a mix of muddy brown tone pigments, and keep it really blown out and softly blended to give it a bit more like shadowing on the face. I feel that these darker tones are also very symbolic of a post apocalypse era - they look more eerie and mysterious.


Hair

For the hair I wanted to create a warrior princess style updo. Something which you can imagine a survivor has found 10 minutes to do a couple of weeks ago and hasn't touched since...


Above Image References right-left:  2, 3, 4

I found the above images of braid styles which I really liked. As I said, I want it to look like a braid which was done weeks before and has just been left, meaning it looks really messy and slept in. 
In order to achieve this look, the products I will use in the hair will be dry shampoo to give some roughness and texture to the hair. It will make it easier for me to style the hair into these updos and give them volume, as it will make the hair a bit thicker. I will also back-comb the hair to give it more of that worn texture which I am going for. 
My favourite is image 4 above on the far right, which depicts a 'faux hawk' braid. I feel that this style is perfect for the concept as it has a powerful almost 'warrior princess' feel to it, which I want to embody in the look.


Back to the make-up....

When it came to creating my make-up looks I initially decided on a colour palette of a few tones. These are all brown and muddy tones, with hints of plum and purple. This is because I still wanted some warmth to the colours, as the saturation for the final fashion film was going to be considerably lowered - so if I used cooler colours they would look even cooler post-edit and not give the depth that I wanted.

I decided to use these same colours throughout my make-up look; on the eyes and face to bring in continuity of the character, and keep it simplistic. Both face charts I created used these same tones but in different ways.

From Top to Bottom:


- MAC Blusher in 'Film Noir'

- MAC Blusher in 'Raizin'

- Kiko Colour Sphere Eyeshadow in '05'

- Kiko Smart Eyeshadow in '04'


I also took the same picture of these swatches and reduced the saturation down on them. This is so that I can see how the colours will look post edit once the saturation of the video has been reduced.

This is something which I feel is important, because without doing this it may completely alter how your make-up looks once the editing is done.

I was happy with how all of these colours looked as they still held the depth of colour which I wanted, and you can still tell the variance of shades between them.

Face Chart #1: 

I have listed all the products used, by clicking on them you can be taken to the relevant site to view them. 


Face Chart #2


Face: 

- Illamasqua Skin Base Foundation:  to give a medium but flawless coverage to the skin. I didn't want anything thick or cakey, and nothing which was overly powdered or matte. This is because I wanted the base to look as natural as possible, but to carve into it with the use of shadow (hence why I did not powder this look also)
- MAC Pro Longwear Concealer under the eyes and in areas which need extra coverage
- MAC Blushers in Raizin and Film Noir (to deepen) as a contour in the hollow of the cheekbones and round the forehead.
- MAC Bronzer in Give Me Sun on the high points of the face such as the nose and cheekbones. This is because this 'character' would have been out in the sun and travelling post-apocalypse. So this is from where they have caught the sun from being outside.

Eyes:

- Illamasqua Brow Cake in Thunder: I did not want an overly carved brow so I used this lightweight powder to give more of a natural overgrown brow look.
- MAC Blusher in Raizin all over the eyelid and buffed up into the inner corner of the brow 
- MAC Blusher in Film Noir on the outer corner of the eye and underneath the waterline 
- Illamasqua Brow Cake in Thunder as a powder eyeliner. I wanted something which wasn't too striking on the eye but still gave definition, so used this waxy brow cake with an angled brush along the upper lash line.
- Illamasqua Masquara  a couple of coats of this on the top and bottom lashes to add definition.

Lips: 

NYX Lip Lingerie in Babydoll: I wanted to use a n1\ude colour to reflect the earthy colours I'd used throughout. As this is a pale shade too I thought it would work well as it will emphasize the dark tones on her face and make her look more eerie. 


References: 

  1. Pickles, E. (2015). Post Apocalyptic Survivor | Makeup Tutorial. [video] Available at: https://www.youtube.com/watch?v=ieSUuY8_iLE [Accessed 21 Apr. 2017].
  2. LoveThisPic. (n.d.). Wild Messy Braid. [online] Available at: http://www.lovethispic.com/image/28325/wild-messy-braid [Accessed 21 Apr. 2017].
  3. BeautyFrizz. (2014). 20 Messy Braided Hairstyles to Fall in Love with. [online] Available at: http://www.beautyfrizz.com/beauty/hair/20-messy-braided-hairstyles-to-fall-in-love-with/ [Accessed 21 Apr. 2017].
  4. gofeminin. (n.d.). Von romantisch bis rockig: Tolle Flechtfrisuren für lange Haare. [online] Available at: http://www.gofeminin.de/mode-beauty/album871355/flechtfrisuren-fur-lange-haare-24551965.html#p41 [Accessed 21 Apr. 2017].

Wednesday, 5 April 2017

Live Model Concept

The Concept

As per my previous blog (click here to view) I decided to base my live model timeline piece on a 1940's World War 2 Soldier, as this is something which is relevant to the industry I want to go into (TV and Film). 

In order to push myself and make this piece stand out I decided to create an injured soldier, and a look that would be needed in a period drama for TV. In my previous post I explored common WW2 injuries, but the one which I decided would be the most fun to do is an artillery shell wound.


So I then set to thinking and researching the wounds associated with artillery shells. Many soldiers who were hit with shrapnel from an artillery shell would have disfigurement as a result, such as the soldier on the right who received a shrapnel wound to the face (Reference 1).

This image on the left (Reference 2) was one which really struck me as a source of inspiration and historically accurate research. This is an image of a German soldier taken in World War 2 after he fell victim to an artillery shell attack. As you can see in the image, the man's entire arm was blown off in the blast and is lay on the ground near him.
These very real scenes are something which I wanted to recreate in my look - as I am also tailoring the look toward TV/Film I wanted it to be as historically accurate as possible so that it would be camera-ready. I then set my sights to creating a prosthetic piece which would encompass this. I decided an arm would be best as it is a live model it might be a bit tricky to make their leg disappear...


Prosthetic Creation

Step 1:
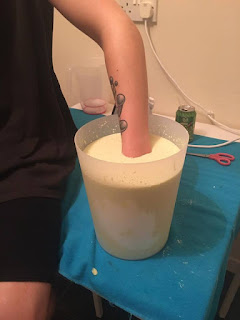
To begin with I mixed 1.1kg of Alginate Powder with 2 litres of water and stirred it until it created a paste (like watery oatmeal consistency). Alginate is a substance which is used by dentists to create moulds of the teeth. I used it to create my mould because its' purpose in dentistry is to capture so much detail - which I need in order for my prosthetic to look realistic. As alginate sets to a rubber-like state, it is safer for the model to place their hand into. Using a material like plaster for example would mean that the models hand would be stuck inside it when it set!


Step 2:

I then asked my model to place his hand into the bucket of alginate. I knew we needed to work relatively quickly as it has a setting time of a few minutes. The powder changes colour as it is setting meaning that you know when it is ready for the model to take their hand out.
It took about 5 minutes in total for the 
algin-ate to firm up and turn into a rubber form. I was then left with the mould on the right of my models hand.


Step 3:
Now that the mould was complete, I had to work quickly to run the mould in silicone. Alginate when left in open air begins to shrink, meaning that a lot of the detail and shape is lost. I therefore set to mixing my Polycraft Silicone ready to pour into my mould. The silicone comes as a clear gel which you must mix with a catalyst which makes it react and begin to harden. I opted for a red catalyst; this enables you to ensure you have mixed it well as you can see the red is evenly dispersed. I also chose red as I wanted it to give my prosthetic the pink undertone it needed as flesh. I used 1.1kg of Silicone in total. 
I added a couple of drops of Flesh Tone silicone pigment to the mix to give it the fleshy undertone, and cancel out some of the red catalyst mixture. 

Step 4:

I then poured the mixture into the alginate mould. I added it in bit by bit and made sure I swirled the mould round so that every part of the hand was covered in silicone. I also banged the mould a few times so that the air bubbles came to the surface.
I poured the remaining silicone ontop of the mould, and scooped some out of the top of the hand area. This is because I wanted some extra flaps of skin hanging off the hand, which I can shred and cover in blood, so that it doesn't look like a clean cut off hand!


Finished Prosthetic (before paint)


So after leaving the silicone to set overnight, I cut the alginate mould open and took out the prosthetic. I'm really happy with the level of detail which the mould has captured, including fine lines and even veins! One thing I'm disappointed about is the amount of air bubbles in the hand which you can see on the above images. This is the result of the mould not being turned enough to release the air bubbles before it began to set. Although I am disappointed with that I'm still extremely proud as this is the first mould prosthetic I've made! 

Next Steps

The next thing to do is to give this hand an awesome paint job! Although this is a great base colour I will need to add in the details of the hand and different undertones to create a realistic illusion. 


References:

  1. 24 General Hospital - Great War Society. (2013). Artillery Casualties (Warning – slightly gory black and white picture!). [online] Available at: https://thegreatwarsocietyhospital.wordpress.com/2013/08/02/artillery-casualties-warning-slightly-gory-black-and-white-picture/ [Accessed 4 Apr. 2017].
  2. Fisher, M. (n.d.). #German soldier with his arm blown off on the Eastern Front during World War 2. [online] Pinterest. Available at: https://uk.pinterest.com/pin/281826889153857104/ [Accessed 4 Apr. 2017].