The Concept
As per my previous blog (click here to view) I decided to base my live model timeline piece on a 1940's World War 2 Soldier, as this is something which is relevant to the industry I want to go into (TV and Film).
In order to push myself and make this piece stand out I decided to create an injured soldier, and a look that would be needed in a period drama for TV. In my previous post I explored common WW2 injuries, but the one which I decided would be the most fun to do is an artillery shell wound.
So I then set to thinking and researching the wounds associated with artillery shells. Many soldiers who were hit with shrapnel from an artillery shell would have disfigurement as a result, such as the soldier on the right who received a shrapnel wound to the face (Reference 1).
This image on the left (Reference 2) was one which really struck me as a source of inspiration and historically accurate research. This is an image of a German soldier taken in World War 2 after he fell victim to an artillery shell attack. As you can see in the image, the man's entire arm was blown off in the blast and is lay on the ground near him.
These very real scenes are something which I wanted to recreate in my look - as I am also tailoring the look toward TV/Film I wanted it to be as historically accurate as possible so that it would be camera-ready. I then set my sights to creating a prosthetic piece which would encompass this. I decided an arm would be best as it is a live model it might be a bit tricky to make their leg disappear...
Prosthetic Creation
Step 1:
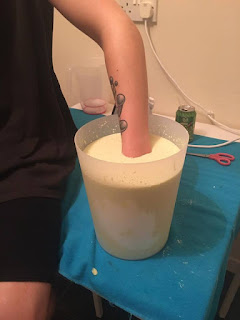
To begin with I mixed 1.1kg of Alginate Powder with 2 litres of water and stirred it until it created a paste (like watery oatmeal consistency). Alginate is a substance which is used by dentists to create moulds of the teeth. I used it to create my mould because its' purpose in dentistry is to capture so much detail - which I need in order for my prosthetic to look realistic. As alginate sets to a rubber-like state, it is safer for the model to place their hand into. Using a material like plaster for example would mean that the models hand would be stuck inside it when it set!
Step 2:
I then asked my model to place his hand into the bucket of alginate. I knew we needed to work relatively quickly as it has a setting time of a few minutes. The powder changes colour as it is setting meaning that you know when it is ready for the model to take their hand out.
algin-ate to firm up and turn into a rubber form. I was then left with the mould on the right of my models hand.
Now that the mould was complete, I had to work quickly to run the mould in silicone. Alginate when left in open air begins to shrink, meaning that a lot of the detail and shape is lost. I therefore set to mixing my Polycraft Silicone ready to pour into my mould. The silicone comes as a clear gel which you must mix with a catalyst which makes it react and begin to harden. I opted for a red catalyst; this enables you to ensure you have mixed it well as you can see the red is evenly dispersed. I also chose red as I wanted it to give my prosthetic the pink undertone it needed as flesh. I used 1.1kg of Silicone in total.
I added a couple of drops of Flesh Tone silicone pigment to the mix to give it the fleshy undertone, and cancel out some of the red catalyst mixture.
Step 4:
I then poured the mixture into the alginate mould. I added it in bit by bit and made sure I swirled the mould round so that every part of the hand was covered in silicone. I also banged the mould a few times so that the air bubbles came to the surface.
I poured the remaining silicone ontop of the mould, and scooped some out of the top of the hand area. This is because I wanted some extra flaps of skin hanging off the hand, which I can shred and cover in blood, so that it doesn't look like a clean cut off hand!
Finished Prosthetic (before paint)

So after leaving the silicone to set overnight, I cut the alginate mould open and took out the prosthetic. I'm really happy with the level of detail which the mould has captured, including fine lines and even veins! One thing I'm disappointed about is the amount of air bubbles in the hand which you can see on the above images. This is the result of the mould not being turned enough to release the air bubbles before it began to set. Although I am disappointed with that I'm still extremely proud as this is the first mould prosthetic I've made!
Next Steps
The next thing to do is to give this hand an awesome paint job! Although this is a great base colour I will need to add in the details of the hand and different undertones to create a realistic illusion.
References:
- 24 General Hospital - Great War Society. (2013). Artillery Casualties (Warning – slightly gory black and white picture!). [online] Available at: https://thegreatwarsocietyhospital.wordpress.com/2013/08/02/artillery-casualties-warning-slightly-gory-black-and-white-picture/ [Accessed 4 Apr. 2017].
- Fisher, M. (n.d.). #German soldier with his arm blown off on the Eastern Front during World War 2. [online] Pinterest. Available at: https://uk.pinterest.com/pin/281826889153857104/ [Accessed 4 Apr. 2017].


<3
ReplyDelete